Using
ndiswrapper with the D-Link DWL-G520 PCI Card
Date: 8/10/05
Introduction
This wireless PCI card uses the Atheros chipset. Remember,
make sure that you check the proper revision number for your card, as
chipsets do change with new revisions of many wireless cards.
Running the command lspci showed the following information for my card.
01:08.0 Ethernet controller: Atheros Communications, Inc. AR5212
802.11abg NIC (rev 01)
Fedora Core 4 Installation:
Unfortunately, Fedora Core 4 continues to suffer from the infamous
kernel stack issue. You must download the Driverloader kernel with the
16 stack patch.2 This kernel is identical to the
core kernel and
installs perfectly. Make sure that you download and install both the
kernel and kernel-devel packages. This assures that you have the kernel
source and necessary symlinks to the new kernel required by
ndiswrapper.
1. Determine what kernel that you are
currently running by running uname
-r in a terminal window.
2. Download the kernel and kernel-devel packages from the Driverloader web site that match your
running kernel. In my case, it was the default kernel,
which showed up when running uname -r as vmlinuz-2.6.11-1.1369_FC4.
3. Reconfigure your bootloader (in my
case, grub) to
boot the new kernel image. Following the instructions, the new kernel
should show up as vmlinuz-2.6.11-1.1369_FC4.stk16
in the /boot directory. Don't forget to add new new initrd entry in
grub, as well.
4. Follow the basic installation of
ndiswrapper, as per the wiki page. 1
My Windows drivers supplied with the D-Link card worked fine for this
installation. Do not run the ndiswrapper -m command to modify you
modprobe.conf file, as we will make a custom entry here later.
Setting up the Wireless Card
This is where things get a little complicated. I borrowed
heavily from the ndiswrapper Fedora specific instructions. 3
I highly recommend following the linked instructions when
setting
up wireless via cable internet connections. However, I made some major
modifications with the instructions to get the card to work.
Specifically, I connect to Verizon DSL on my system, so some of the
instructions noted below do not apply.
Setting up a Wired Connection using PPPOE
(using a DSL connection)
The first step in this process involves setting up a DSL connection via
a wired card. Assuming that you have a wired NIC card that has already
been recognized by Fedora, use the Network Connection Tool
(Start-->System Settings-->Network) to set up DSL. You
will need
to know your user id, password and location of the wired card, in most
cases eth0. Fedora had a good deal of issues with doing this at boot,
so I placed an icon on my desktop to enable my connection after
booting.
Once your DSL connection is up and running, we can turn to wireless. In
Fedora, you are going to modify your /etc/sysconfig/network-scripts/
files to match the wireless card settings. As noted in the ndiswrapper
with Fedora article, 3 Fedora has difficulty
seeing wlan
connections. So we will follow those instructions to create the
ifcfg-eth2 and keys-eth2 files needed by Fedora. This will allow
Fedora's Network Connection Utility to see the interface.
In the ifcfg-eth2 file, I added my essid assigned to the DSL modem.
In the keys-eth2 file, I added my WEP key (KEYS=xxxxxxxxxx) for my 64
bit WEP password key.
Reboot the system to allow Fedora to make it's necessary changes.
Here is where the trick comes in. You already have a PPPOE connection
script set up in /etc/sysconfig/network-scripts/ifcfg-Verizon
(Which is what I named my PPPOE connection). Using your
favorite
text editor, edit the key line in the DSL file to point to your newly
configured ifcfg-eth2 file. look for the line that says;
ETH=eth0 and change the value of the ethernet to use to eth2 (in our
example case here). Save the change and see if you can bring
up
your original PPPOE connection in the Network Connection tool, by
highlighting the PPPOE entry and clicking on "activate."
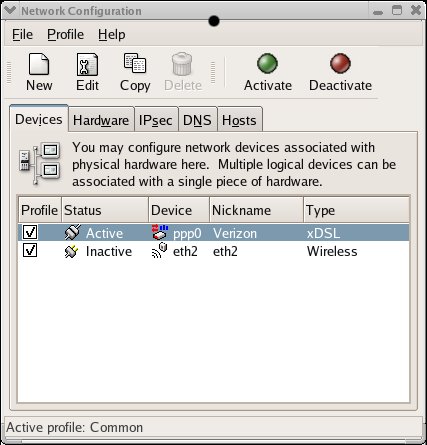
You should have a wireless connection using your DSL router/modem, with the resulting message "active" under Status.
NOTE: Ignore the second eth2 configuration seen on the screen shot.
While configuring my DSL connection, I was experimenting with the
settings to see what would work.
References:
1. ndiswrapper
installation instructions
2. Fedora
Driverloader 16 stack kernel
3. Ndiswrapper
with Fedora